We had a lovely family day yesterday, with all of us heading out for some downhill skiing. Sir Monkeypants took the older two kids for the first time in December and since then the three of them have been hooked; yesterday they convinced me and the Little Miss to try a beginner lesson. I doubt any Olympic events are in my future but it was fairly fun.
Also, the way Gal Smiley yelled “PIZZA PIZZA PIZZA PIZZA PIZZA!!!!” at me all the way on my first trip down the bunny hill will live on as one of my favourite memories of all time. Pizza it is, honey.
Anyway, just a quick post today as I’m swamped with work (catching up from last week), dealing with The Basement Crisis (we have decided to just throw money at the problem and hope it goes away), and of course, those Olympics are NOT GOING TO WATCH THEMSELVES. Mostly I wanted to post the recipe for the Black and White cookies, as requested by Sarah and Javamom.
This recipe is from Vegan Cookies Invade Your Cookie Jar, by Isa Chandra Moskowitz and Terry Hope Romero. If you have any interest in vegan cooking at all, I highly recommend buying everything Isa Chandra has ever published. I have several of her cookbooks but her cookie book, plus her little cupcake book and pie book, are priceless. I love it that her recipes always try to use generic ingredients in inventive ways – I mean, I CAN figure out that a regular recipe that calls for yogurt can be “veganized” by using soy yogurt instead, but her recipes don’t just swap out butter with “vegan bread spread,” but rather actually bake with real stuff.
I have made dozens of recipes from the cookie book and they are all delicious and fabulous. But one word of warning, if you do buy this book: for some reason, I always have to add more flour to have the recipes turn out. I do not have this problem with any of her other books, and the cupcake and pie books are fine. But in the cookie book, it’s standard to add about 1/3 cup more flour for every 1 cup the recipe calls for (so, 1 1/2 cups becomes 2 cups, for example). I don’t know why this is – she talks in the intro about how she measures her flour by scooping, while I am a strict Grade 8 Home Ec Spoon-and-Level-with-a-Knife measurer, so maybe that is it, or maybe it’s the flour I use (Five Roses Unbleached). It’s a mystery.
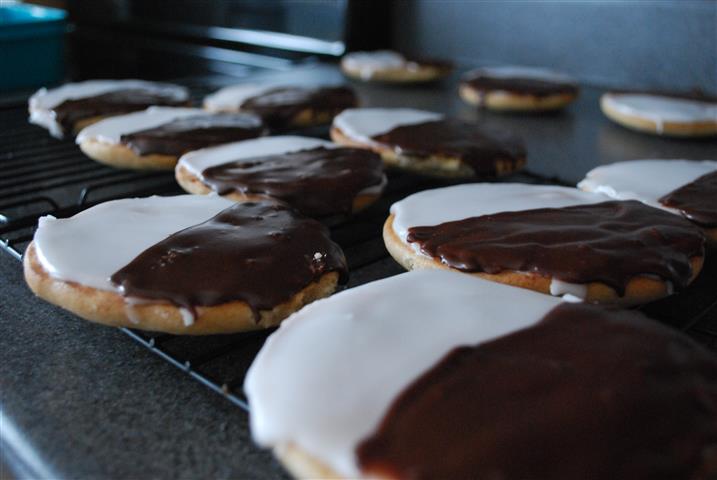
Anyway, here is the Black and White cookie recipe, with my change for additional flour added. These cookies are a little fussy, but WORTH IT. They would make an excellent substitution for birthday cupcakes or for fancy Christmas parties. I froze some as an experiment and they freeze and thaw well, but they do stick together if stacked so it’s best to freeze them on a pan then bag them, or at least put a little wax paper between layers.
The NYC Black and White Cookie
1 cup soy milk (I use rice milk as my son can’t have soy)
2 teaspoons lemon juice
1/2 cup canola oil
1 1/4 cups sugar
1/4 teaspoon lemon extract
1/4 teaspoon orange extract (find it at the Bulk Barn, or use 1/2 teaspoon zest)
3 1/3 cups all-purpose flour (original recipe calls for 2 1/2 cups)
1/4 cup cornstarch
1 1/4 teaspoons baking powder
1/2 teaspoon baking soda
3/4 teaspoon salt
For the icing:
4 cups icing sugar
1/4 cup boiling water, plus several additional tablespoons of hot water
2/3 cup chocolate chips (I use Enjoy Life brand for allergy-safeness)
Preheat oven to 350. Line two cookie sheets with parchment paper – actually, three is probably better.
Mix the soy milk and lemon juice, and let it sit one minute to curdle (if using rice milk, it won’t curdle, but that is okay; real milk can be used if you aren’t vegan and it’ll curdle something awesome). Add the oil, sugar, vanilla, and other extracts and whisk until blended into a smooth caramel-type mix.
Add the flour, cornstarch, baking powder, baking soda, and salt. Stir well to form a very thick batter, kind of like very thick cake batter.
Using a 1/4 cup measuring cup or an ice cream scoop, scoop up a bunch of batter and pour it out onto the cookie sheets. The pile of batter will spread quite a bit – if you have large cookie sheets you’ll be able to barely fit eight cookies on a sheet (the recipe makes 16 cookies), but if your sheets are smaller you might only fit six or even four per sheet. If they end up spreading so that they touch it’s not ideal but won’t hurt the tastiness, so just throw them in the oven and break them apart when they come out. Don’t worry too much about making perfect circles, either, since they spread so much they will turn into circles on their own.
Bake for 18 to 20 minutes until a toothpick comes out clean. Let them cool for about 2 minutes on the pans, then peel them off of the parchment paper and place them face-down on a rack to cool. They’ll be lightly curved on the bottom (what was the top when cooking) and nice and smooth and flat on the top (what was the bottom when cooking).
While they are cooling (it doesn’t take long), mix up the icing. Mix the powdered sugar with the boiling water and stir very well, then dribble in more hot water a bit at a time until you can stir it smoothly – it should not be runny but should be easily spreadable and kind of glossy. Frost the entire smooth tops of the cookies with the vanilla icing, right out to the edges. You should have about 1/2 cup of icing left over at the bottom of the bowl – don’t eat it, you need it!
Now take the chocolate chips and melt them in the microwave or in a double boiler (in the microwave: 1 minute on power level 60, stir, then 30 seconds to one minute more at 60, stirring every 30 seconds). Make sure it’s really melted well or your chocolate icing will be lumpy.
Add the melted chocolate to the leftover icing and stir well – I had to add a little more boiling water to the mix to help it be spreadable and to keep the chocolate from lumping up.
Test the cookies with your finger to make sure the vanilla icing has developed a bit of a crust. Then, spread the chocolate on half, and put the cookie down to finish drying completely.
The recipe suggests that they are best eaten the day they are made, but trust me, I had NO PROBLEM eating them on the second day. Plus, as noted above, the frozen ones turned out well (good thing, because if I didn’t freeze them I would now have 16 black and white cookies in my belly).
The recipe makes 16 palm-sized cookies but you can also make 24 smaller ones if you like. They’re quite sweet and eating one of the regular sized-ones is on par with having a cupcake, I’d say.
Enjoy!

Thanks Lynn!!!!!!!! look to the cookie 🙂
No, the Olympics certainly will not watch themselves. Just trying to do my part as well.
Yesss look to the cookie! Will have to try these and eat them ALL. Thanks!
these sound delicious (and pretty too)