
I’ve had Peppermint Bark on our advent calendar every year, and it’s always a HUGE hit, the kids look forward to making it AND eating it. I have a complicated, fancy recipe on this blog (here, way down at the end of the post), suitable for making gift-type boxes for teachers and whatnot, but last year I said screw pretty, let’s do easy instead! And it was great – this is my quick and dirty way of making peppermint bark and I don’t think we are ever going back.
Quick and Easy Peppermint Bark, suitable for all ages
For EACH kid, you will need:
one 8×8 square cake pan, or a 9 inch round cake pan
1 cup white chocolate chips (see note below)
1 Tablespoon canola oil
12 to 15 miniature candy canes
a hammer
some parchment paper or wax paper
* About the chips: peppermint bark is traditionally made with white chocolate, and you will get the best results that way. But the Captain can’t have white chocolate due to allergies, so he makes his batch with Enjoy Life brand dark chocolate chips. It’s not as pretty, but just as delicious, and since each kid is making their own pan here, we can mix it up easily (the girls use white).
Step 1 – Hand your kids their set of candy canes and have them unwrap them. This may take a while – grab yourself a cup of tea and a magazine. If you have very young kids who cannot unwrap the canes themselves, then do this step ahead of time, otherwise your wee ones will get extremely bored watching you pick wrapping off for 20 minutes.
Step 2 – Line each kid’s cake pan with parchment paper. Bring it right up the sides; don’t worry if it’s popping up and shifting all over the place.
Step 3 – Put the unwrapped candy canes in a large freezer bag (you may want to double bag if you have enthusiastic hammerers). Put the bags on the kitchen counter and let the kids hammer away at them. You’re looking for chunks, maybe about 1 cm in length at the most, but not powder (some dust is okay).
Step 4 – Put each kid’s chocolate chips in their own microwave safe bowl. Put one bowl at a time in the microwave. Microwave the chips for 1 minute at 50%. Remove, stir (probably won’t see much results yet), and drizzle the 1 Tbsp oil on top. Return to microwave and nuke for another minute at 60%. Give it a good stir – this should be enough to melt the chips completely, but if you still have chunks you can put it back in for 30 second intervals at 50% (for some reason the Enjoy Life chips do take this extra amount of time).
Step 5 – Pour each kid’s candy cane bag into their bowl of melted chocolate and have them stir it up.
Step 6 – Dump the contents of each kid’s bowl into their cake pan (get the kid to hold the parchment paper in place).
Step 7 – Spread the mixture to the far corners of the cake pan using a spatula; try to get it as even and flat as possible.
Step 8 – Put each pan in the freezer for around an hour.
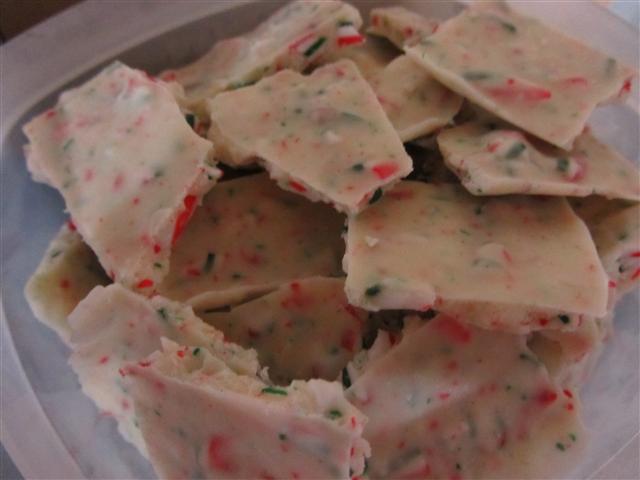
Step 9 – Remove the bark from the freezer, peel it off the parchment paper. Use your hands to break it into chunks of random sizes. Put the chunks into a tupperware container.
You can keep this at room temperature and it will be fine but I like to keep ours in the freezer for lasting freshness (and to stop me from eating it all while the kids are sleeping). Remove a piece and give it five minutes or so to warm up before eating. You can double this recipe for a 9×13 pan.
Enjoy!

This looks great Lynn. I have a tip for getting parchment paper to stay tucked into a pan. Rip off the amount of paper you need for your pan and crinkle it up into a ball, then smooth it out again. The paper will now let you crease it into the pan and stay tucked into the corners much better. The more you crinkle it/smooth it out again, the better it behaves.
Huh, I had never heard of that before. Definitely will try that next time – we are making more next week for a school Christmas party so this tip is timely!
Sounds yummy. Gotta try that one out. I’m trying the parchment tip too!
So there’s no picture because you ate it all? 🙂
Huh, it never even occurred to me to include a picture! I’ve added a small one to the bottom of the post. Aaaaaaand – now I’m hungry.
I myself don’t like mint & chocolate but this is a nice easy recipe and the kids will love the hammers. 🙂 Going to try this today!
Maya and I followed the detailed recipe last year and enjoyed it. It’s on our list to do again this year but I think we’ll try your abbreviated instructions. Maya’s favourite part was smashing the candy canes!
I’ve been using your old recipe (with regular and white chocolate) since you posted it a few years ago. I love it and it’s a big hit at bake sales this time of year. This version sounds good too, especially for an emergency sweets craving 🙂
This one is 90% as good and soooooo much faster and easier. The Little Miss and I just whipped up a batch for her class party next week in like, 15 minutes, and she practically did all the work herself. So for a kid-based sweet, go for this one!
This weekend we make some Peppermint Bark. Nice simplified recipe!